

If you've ever tried to learn Bluetooth Low Energy (Bluetooth LE), you know the frustration. Download a vendor SDK, configure toolchains, write embedded C, flash firmware—and maybe, after a full day, you'll see your first advertising packet. The tooling gets in the way of the learning.
That's exactly why I chose BleuIO for my new hands-on course, Bluetooth LE Unplugged. It strips away all that complexity and lets you focus on what actually matters: understanding the protocol.
In this post, I'll walk you through everything you need to get started with BleuIO—from unboxing to running your first Bluetooth LE commands. By the end, you'll have scanned for nearby devices, understood what the results mean, and made your own dongle visible to the world.
Here's what we'll cover:
- What BleuIO is and why it's different from traditional development kits
- The hidden superpower: bypassing your computer's Bluetooth stack entirely
- Real-world applications (production testing, industrial IoT, automation)
- Setting up your hardware and software
- Your first AT commands (and what they do)
- Scanning for nearby Bluetooth LE devices
- Understanding scan results (MAC addresses, RSSI, advertising data)
- Making your dongle visible with custom advertising
- The two-dongle advantage for complete visibility
- Troubleshooting common setup issues
Let's get started.
What is BleuIO?
BleuIO is a Bluetooth LE USB dongle that you control through simple text commands—no embedded C, no SDK, no compilation required.
Here's why that matters: traditional Bluetooth LE development requires you to learn a vendor's SDK (often thousands of files), set up a specific toolchain, write firmware in C, and flash it to a development board. That's a lot of friction when you just want to understand how advertising works.
BleuIO uses AT commands—the same command style used in modems for decades. If you can type text into a terminal, you can control BleuIO. For example, to start advertising:
AT+ADVSTARTThat's it. Your dongle is now broadcasting Bluetooth LE packets.
Key Specifications
Let's look at what you're working with:
- Bluetooth Version: Bluetooth LE 5.0 (5.2 on Pro model)
- Connections: Up to 8 simultaneous connections per dongle
- Roles: Central, Peripheral, or both simultaneously
- Interface: USB virtual serial port (no special drivers on most systems)
- Libraries: Python (
pip install bleuio) and JavaScript available - Chipset: Renesas DA14683 (Standard version) and DA14695 (Pro version) SoC (same chip used in commercial products)
- Price: $29-45 USD (available from our US store with fast domestic shipping)
I recommend BleuIO specifically because you're not learning on a toy—you're working with production-grade hardware that's used in real commercial products.
The Hidden Superpower: No Host Bluetooth Stack Required
Here's something most people don't realize until they've struggled with it: BleuIO has its own complete Bluetooth LE stack built into the dongle. You're not using your computer's Bluetooth at all.
Why does this matter? Let me explain.
If you've ever tried to build a Bluetooth LE application using your computer's native Bluetooth, you've likely encountered these frustrations:
- Windows: The Bluetooth stack is locked down. Accessing raw advertising data or controlling low-level parameters requires complex WinRT APIs, and many operations simply aren't exposed.
- macOS: Apple restricts Bluetooth LE access significantly. You need to use CoreBluetooth, which abstracts away protocol details and limits what you can do programmatically.
- Linux: BlueZ is powerful but notoriously complex. Configuration varies between distributions, and getting consistent behavior across systems is a challenge.
With BleuIO, you bypass all of this. The dongle appears as a simple serial port—something every operating system handles identically. Your Python script, Node.js application, or shell command works exactly the same on Windows, macOS, and Linux. No platform-specific APIs, no permission issues, no driver headaches.
For example, this Python code runs identically on any operating system:
import serial

dongle = serial.Serial('/dev/ttyUSB0', 57600)  # or 'COM3' on Windows
dongle.write(b'AT+GAPSCAN=5\r')
print(dongle.read_until(b'SCAN COMPLETE'))
This portability opens up powerful possibilities that aren't practical with native Bluetooth stacks.
Real-World Applications
BleuIO's architecture makes it ideal for scenarios where reliability, portability, and automation matter:
Production Line Testing
Manufacturing facilities need to test Bluetooth LE devices as they come off the assembly line. With BleuIO, you can build test stations that:
- Connect to devices and verify GATT services
- Measure signal strength for antenna validation
- Run automated test sequences across hundreds of units per day
- Work on whatever operating system the factory already uses
I've seen teams save hundreds of engineering hours by automating tests that previously required manual interaction with mobile apps.
Industrial IoT Gateways
In industrial settings, you often need to collect data from multiple Bluetooth LE sensors—temperature monitors, vibration sensors, environmental sensors. BleuIO can:
- Connect to up to 8 sensors simultaneously per dongle
- Run on industrial PCs, Raspberry Pi, or edge devices
- Operate 24/7 without the stability issues that plague native Bluetooth stacks
- Scale by adding more dongles (each appears as a separate serial port)
Automated QA and CI/CD Pipelines
Software teams building Bluetooth LE products can include hardware-in-the-loop testing in their continuous integration pipelines. BleuIO makes this practical because:
- Tests run identically on developers' machines (any OS) and CI servers
- No special Bluetooth permissions or VM configurations required
- Scripts are simple serial communication—easy to maintain and debug
Kiosk and Retail Applications
Interactive kiosks that need to communicate with customer devices (for loyalty programs, proximity marketing, or check-in systems) benefit from BleuIO's reliability. The dongle handles the Bluetooth complexity while your application focuses on business logic.
Healthcare Device Development
Medical device manufacturers testing Bluetooth LE blood pressure monitors, glucose meters, or patient monitors can build consistent test environments that work across their engineering teams, regardless of what computers they use.
Multi-Device Orchestration
Need to control dozens of Bluetooth LE devices simultaneously? Connect multiple BleuIO dongles to a single computer. Each dongle supports 8 connections, so four dongles give you 32 simultaneous connections—something that's nearly impossible with native Bluetooth stacks.
Why Portability Matters
Let me share a concrete example. I've worked with teams where:
- Developers use macOS
- QA uses Windows
- Production runs on Linux
With native Bluetooth, they needed three different codebases, three sets of APIs, and constant cross-platform debugging. With BleuIO, they write one script that works everywhere. The dongle abstracts away the operating system entirely.
This isn't just about convenience—it's about building applications that actually ship. When your Bluetooth LE code works identically on every platform, you eliminate an entire category of bugs and support issues.
What You'll Need
Before we dive in, let's make sure you have everything ready.
Hardware
Required:
- 1× BleuIO USB dongle (Standard $29, Pro $45)
- Computer with a USB port (Windows, macOS, or Linux)
Recommended (for later in the series):
- 2× BleuIO dongles (to see both sides of Bluetooth LE communication)
- Smartphone with a Bluetooth LE scanner app (nRF Connect for iOS or Android, LightBlue, or BLE Scanner)
Where to Buy: Novel Bits is an official US distributor for BleuIO. Get yours from our US store → with fast domestic shipping (typically 3-5 business days). You can also purchase directly from bleuio.com (ships from Sweden).
Software
You'll need a way to send commands to the dongle. Choose one:
Option 1: BleuIO Web Terminal (easiest)
- No installation required
- Works in Chrome, Edge, or any WebSerial-compatible browser
- Visit: bleuio.com/bleuioapp/
Option 2: Desktop Terminal Application
- Windows: PuTTY, RealTerm, or Tera Term
- macOS:
screencommand or CoolTerm - Linux:
screen,minicom, orpicocom
Option 3: Python (for automation later)
- Python 3.8+
- BleuIO library:
pip install bleuio
For this tutorial, I recommend starting with the Web Terminal—it's the fastest way to get going.
Setting Up Your BleuIO
Let's get the dongle connected and verify it's working.
Step 1: Plug In the Dongle
Insert your BleuIO into any USB port. On most systems, it will appear as a virtual serial port automatically—no drivers needed.
What to expect:
- Windows: A new COM port appears (check Device Manager → Ports)
- macOS: A device like
/dev/tty.usbmodem*appears - Linux: A device like
/dev/ttyUSB0or/dev/ttyACM0appears
Step 2: Wait for the Bootloader
When you plug in BleuIO, it enters a 10-second bootloader window (for firmware updates). Just wait for this to pass—you'll see the LED behavior change when it's ready for commands.
Step 3: Connect Your Terminal
If using the Web Terminal:
- Go to bleuio.com/bleuioapp/
- Click "Connect"
- Select your BleuIO device from the popup
- You should see a terminal ready for input
If using a desktop terminal (PuTTY, screen, etc.):
Configure these serial settings:
| Setting | Value |
|---|---|
| Baud rate | 57600 |
| Data bits | 8 |
| Parity | None |
| Stop bits | 1 |
| Flow control | None |
For example, on macOS or Linux:
screen /dev/tty.usbmodem* 57600Step 4: Verify the Connection
Type this command and press Enter:
ATYou should see:
OKIf you see OK, congratulations—your BleuIO is connected and ready! If not, check the troubleshooting section at the end of this post.
Your First AT Commands
Now that we're connected, let's explore a few basic commands to understand how BleuIO works.
Command 1: AT - Connection Test
ATResponse: OK
This is the simplest command—it just confirms that communication is working. I recommend using this whenever you're unsure if the dongle is responding.
Command 2: ATI - Device Information
ATIResponse:
Smart Sensor Devices
DA14695
BleuIO
Firmware Version:2.7.6
Peripheral role
Not Connected
Not Advertising
This tells you the manufacturer, chipset, firmware version, current role, and connection state. If you're following along with this series, I recommend having firmware v2.7.0 or later for all features to work correctly.
Command 3: AT+GETMAC - Your MAC Address
AT+GETMACResponse:
OK
OWN MAC ADDRESS:40:48:FD:EB:AC:12
This is your dongle's Bluetooth MAC address—its unique identifier on the network. You'll see this address when scanning from other devices. Your MAC address will be different from this example.
Command 4: AT+GAPSTATUS - Current State
AT+GAPSTATUSResponse:
Dual role
Not Connected
Not Advertising
This shows what your dongle is currently doing: its role (Central, Peripheral, or Dual), connection status, and whether it's advertising. Right now, it's not advertising or connected to anything.
Discovering Nearby Devices
Here's where it gets interesting. Let's scan for every Bluetooth LE device in range.
Start a Scan
Type this command to scan for 10 seconds:
AT+GAPSCAN=10What happens: Your dongle listens on the three advertising channels (37, 38, and 39) and reports every Bluetooth LE device it hears.
Understanding the Output
You'll see something like this:
SCANNING...
[01] Device: [1]30:63:C5:D0:B1:DE RSSI: -38
[02] Device: [0]D0:76:50:80:0A:98 RSSI: -75
[03] Device: [1]27:5D:B8:2E:96:B0 RSSI: -51
[04] Device: [1]5E:CE:CF:C5:20:BB RSSI: -84
SCAN COMPLETE
Let's break down what each part means:
[01] Device: [1]30:63:C5:D0:B1:DE RSSI: -38
  │           │  │                       │
  │           │  │                       └── Signal strength in dBm
  │           │  └───────────────────────── MAC address
  │           └──────────────────────────── Address type: [0]=Public, [1]=Random
  └──────────────────────────────────────── Device index
Address Types
The number in brackets indicates the address type:
- [0] Public address: Permanent, factory-assigned MAC address (like traditional Ethernet MACs)
- [1] Random address: Generated address, often used for privacy (many smartphones use these)
For example, Apple devices typically use random addresses that change periodically to prevent tracking.
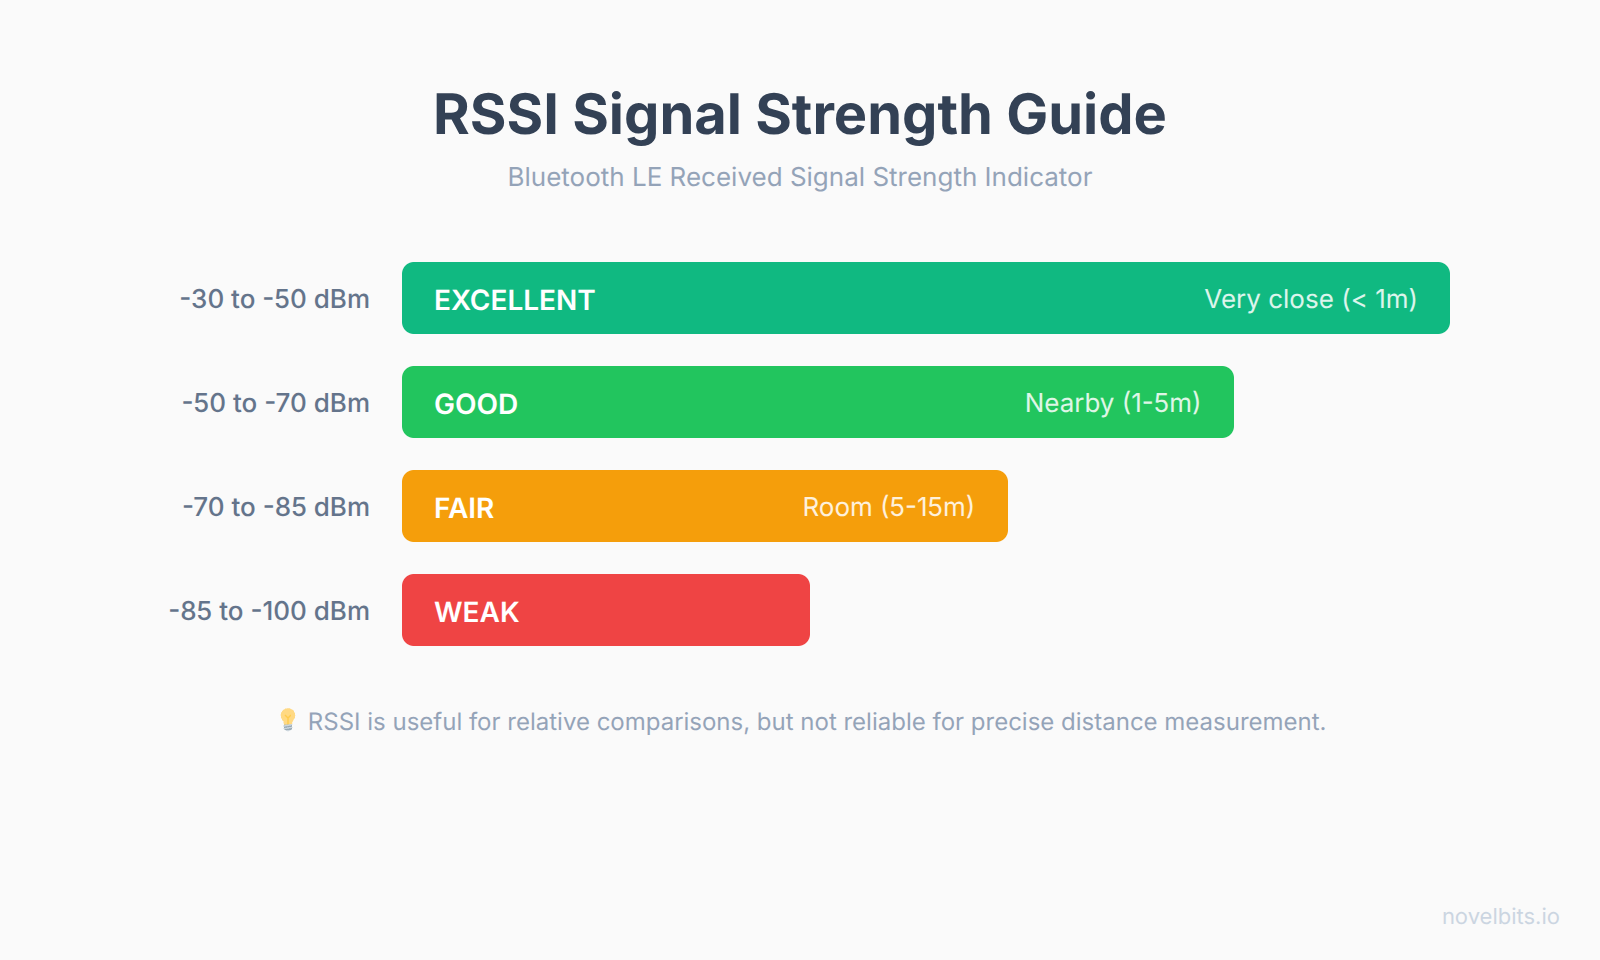
RSSI (Signal Strength)
The negative number (like -65) is the Received Signal Strength Indicator (RSSI) in dBm—a measure of how strong the signal is from that device:
Advertising Data
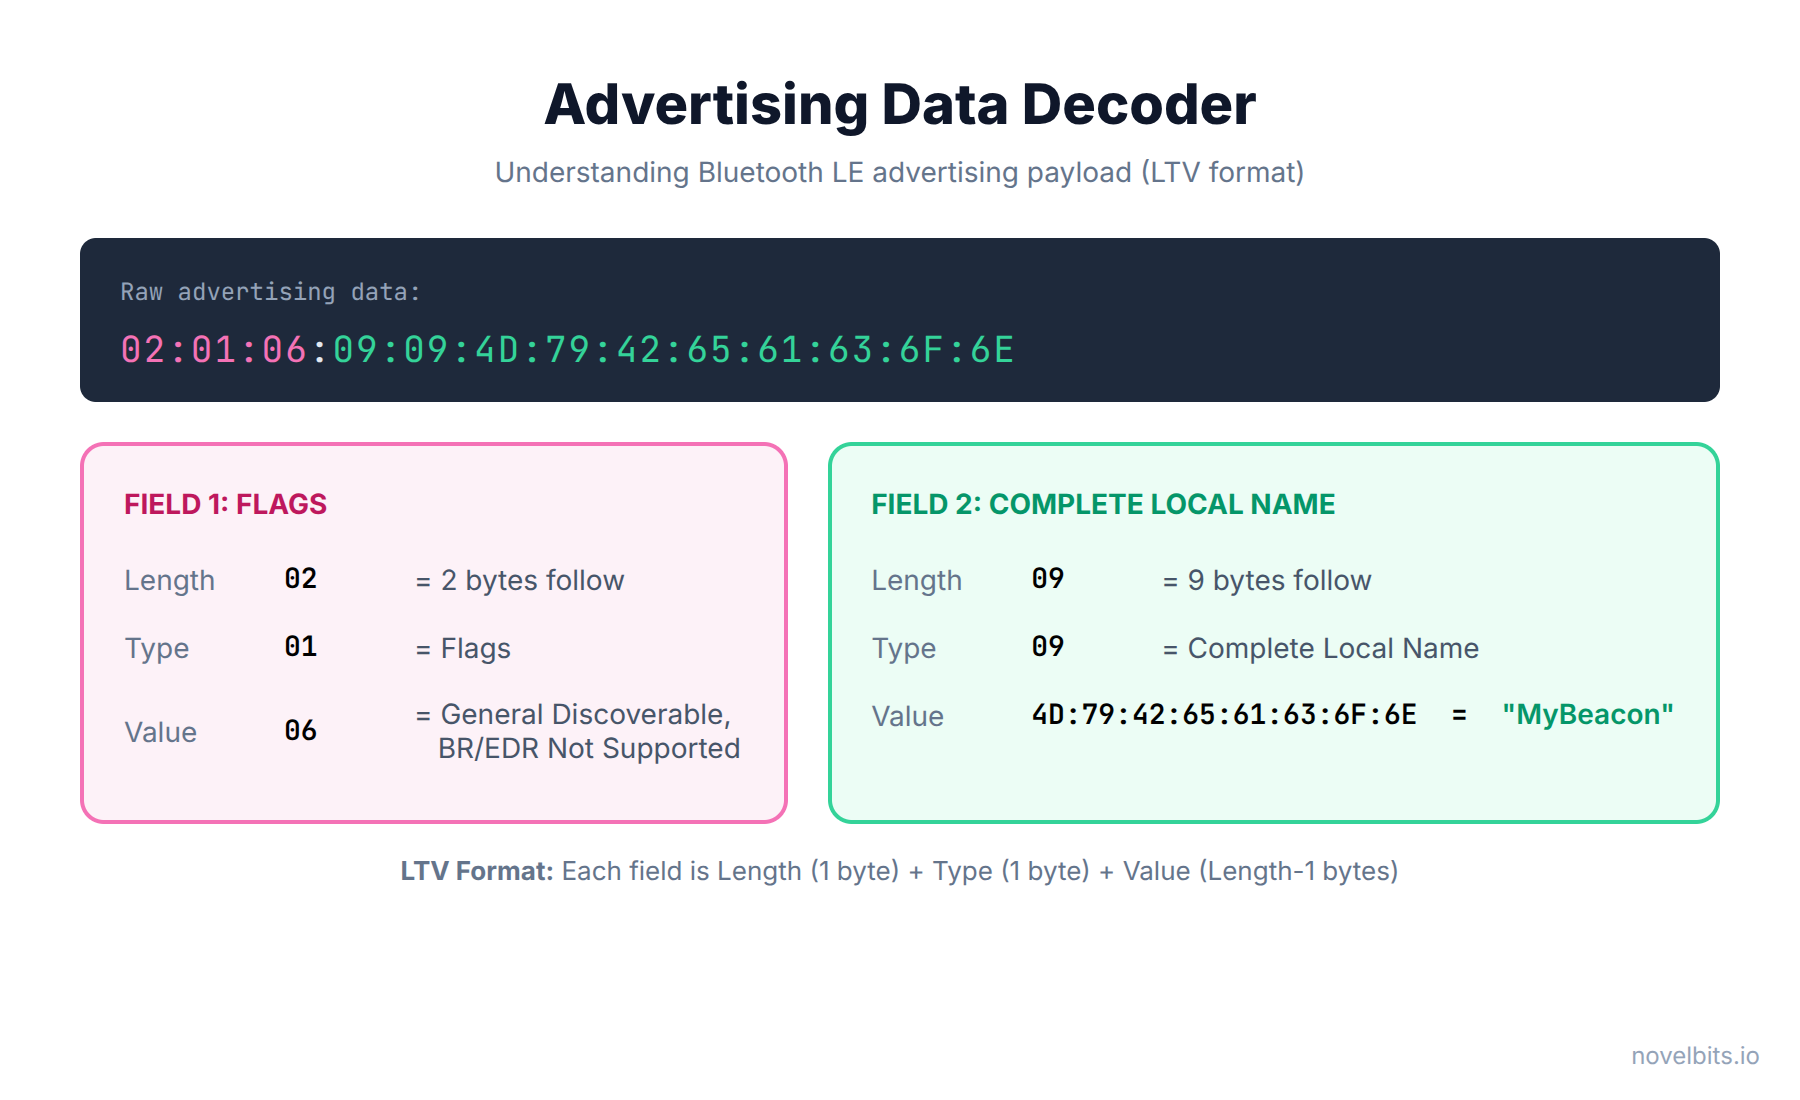
The basic scan shows addresses and signal strength, but Bluetooth LE devices also broadcast an advertising payload—up to 31 bytes of useful data. To see this data, use the AT+FINDSCANDATA command:
AT+FINDSCANDATAThis shows the raw advertising data in hex format:
[D0:76:50:80:0A:98] Device Data [ADV]: 02010609094D79426561636F6EThe advertising payload is encoded in LTV (Length-Type-Value) format. Let me decode this example:
| Bytes | Meaning |
|---|---|
02 01 06 |
Length=2, Type=0x01 (Flags), Value=0x06 (General Discoverable, BR/EDR Not Supported) |
09 09 4D 79 42 65 61 63 6F 6E |
Length=9, Type=0x09 (Complete Local Name), Value="MyBeacon" (ASCII) |
Common advertising data types you'll see:
- 0x01 - Flags (discoverability, BR/EDR support)
- 0x02/0x03 - 16-bit Service UUIDs (incomplete/complete)
- 0x06/0x07 - 128-bit Service UUIDs (incomplete/complete)
- 0x08/0x09 - Device Name (shortened/complete)
- 0xFF - Manufacturer Specific Data (company ID + custom data)
What Devices Will You Find?
When you scan, you'll likely discover:
- Smartphones (often with random addresses, minimal advertising data)
- Smart TVs (many advertise for remote pairing)
- Wireless earbuds (usually when in pairing mode)
- Fitness trackers and smartwatches
- Smart home devices (thermostats, locks, sensors)
- Bluetooth beacons (retail, navigation, asset tracking)
- Other BleuIO dongles (if you have more than one)
For example, if you see advertising data starting with 4C:00, that's Apple's company ID—you've found an iPhone, iPad, AirPods, or other Apple device.
Making Yourself Visible
Now let's flip the script—instead of scanning, let's make your dongle visible to the world.
Set Your Device Name
First, let's give your dongle a recognizable name:
AT+DEVICENAME=MyFirstBeaconResponse: OK
This name will appear when other devices scan for you.
Start Advertising
Now, start broadcasting:
AT+ADVSTARTResponse: OK
Your dongle is now advertising! It's sending packets on channels 37, 38, and 39, announcing its presence to the world.
Verify with Your Phone
Open a Bluetooth LE scanner app on your smartphone (nRF Connect is my favorite). You should see "MyFirstBeacon" in the list of nearby devices.
Try walking around while watching the RSSI value change—you'll see the signal strength decrease as you move away from your dongle.
Stop Advertising
When you're done:
AT+ADVSTOPResponse: OK
Experiment: Change the Advertising Interval
By default, BleuIO advertises every 30 milliseconds. You can change this to see the tradeoff between discoverability and power consumption:
AT+ADVSTART=1000This advertises every 1000ms (1 second). Now scan from your phone—you'll notice it takes longer to discover the device because it's broadcasting less frequently.
For battery-powered beacons, longer intervals save power. For devices that need quick discovery, shorter intervals (20-100ms) are better.
The Two-Dongle Advantage
Here's where BleuIO really shines for learning. With two dongles connected to your computer, you can see both sides of Bluetooth LE communication simultaneously.
Why This Matters
In Bluetooth LE, there are two fundamental roles:
- Central: The device that scans and initiates connections (like your phone)
- Peripheral: The device that advertises and accepts connections (like a heart rate monitor)
With one dongle, you only experience one side. You can advertise, but you need your phone to scan. You can scan, but you need some external device to advertise.
With two dongles, you control everything. Let's try it.
If you only have one dongle, consider picking up a second one from our US store—the Pro 2-Pack is the most cost-effective way to get started with two-dongle development.
Two-Dongle Experiment
Open two terminal windows, one connected to each dongle.
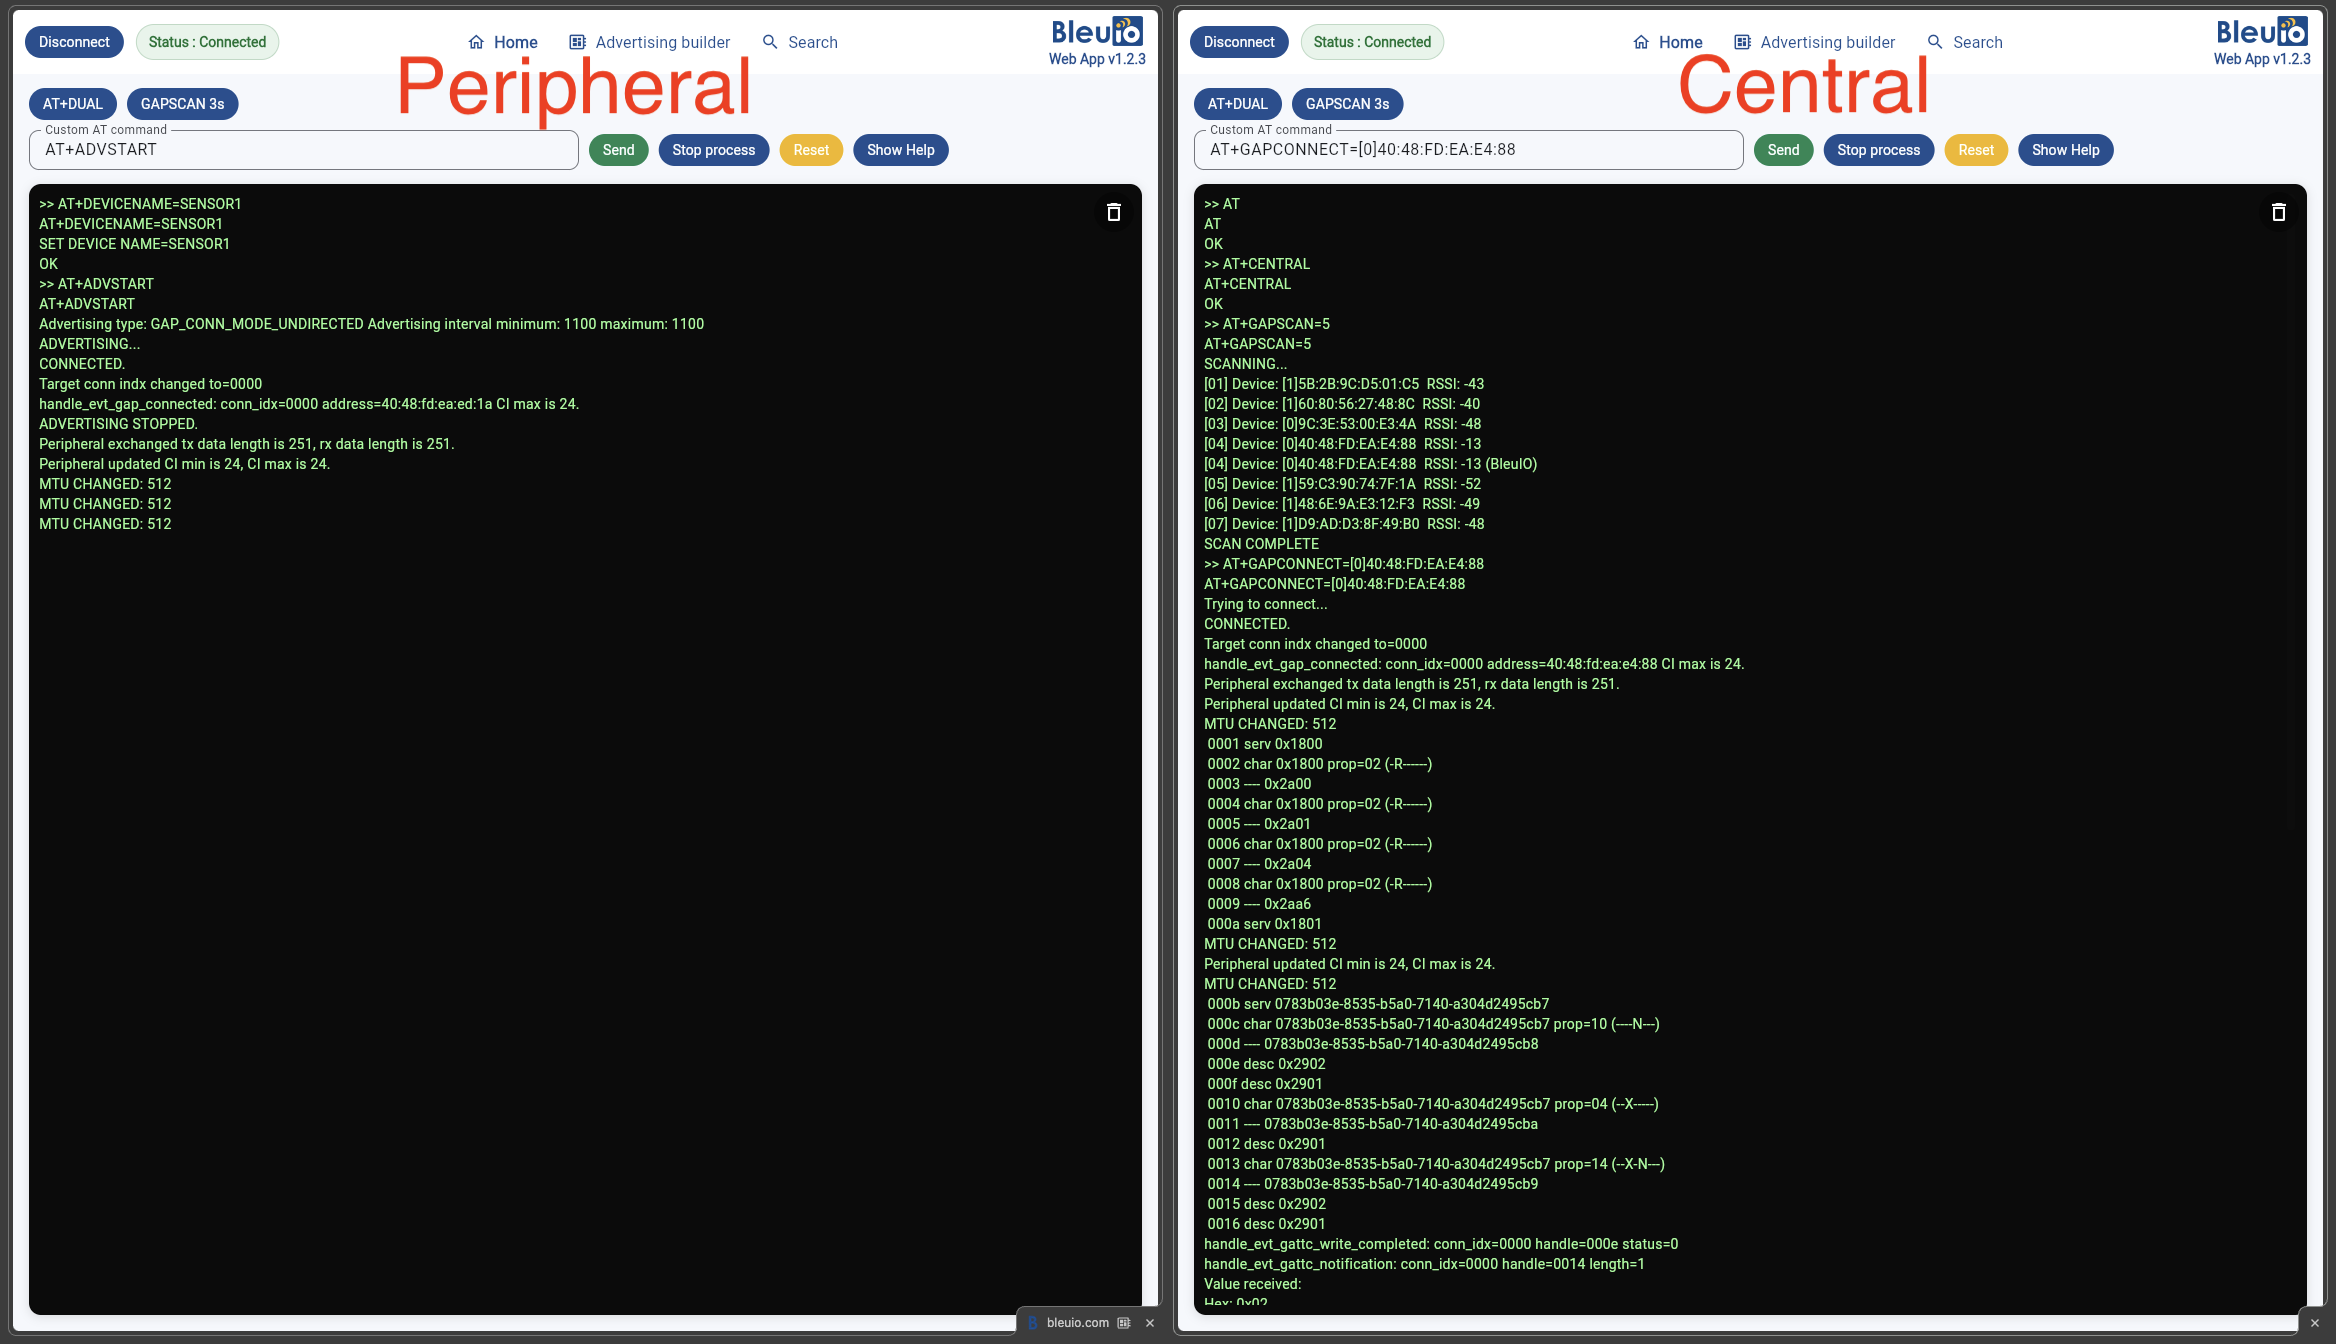
Terminal 1 (Peripheral):
AT+PERIPHERAL
AT+DEVICENAME=Sensor1
AT+ADVSTART
Terminal 2 (Central):
AT+CENTRAL
AT+GAPSCAN=5
In Terminal 2, you'll see "Sensor1" appear in the scan results—your second dongle discovered the first one.
Now take it further and connect:
Terminal 2:
AT+GAPCONNECT=[0]XX:XX:XX:XX:XX:XX(Replace XX:XX:XX:XX:XX:XX with the MAC address from Terminal 1's AT+GETMAC. The [0] indicates a public address; use [1] for private/random addresses.)
You now have a live Bluetooth LE connection between two devices you fully control. You can watch the connection establishment from both perspectives—something that's incredibly valuable for understanding the protocol.
I'll cover connections and data exchange in depth in the next posts, but this gives you a taste of what's possible.
Troubleshooting Common Issues
Let me share some issues I've seen developers encounter and how to fix them.
"Dongle Not Recognized"
Symptoms: No COM port appears, or the device isn't listed in the Web Terminal.
Solutions:
- Try a different USB port - Some USB hubs have compatibility issues
- Wait for the bootloader - BleuIO has a 10-second bootloader window on startup; wait for it to pass
- Check for driver issues (Windows) - Open Device Manager and look for unknown devices; you may need to install the CP210x USB driver
- Try a different cable - Some USB cables are charge-only and don't support data
"No Response to AT Commands"
Symptoms: You type AT but nothing happens.
Solutions:
- Check baud rate - Must be 57600
- Check line ending - Some terminals need CR+LF, others just CR
- Wait for bootloader to finish - Try again after 15 seconds
- Reset the dongle - Unplug, wait 5 seconds, replug
- Check terminal connection - Make sure you're connected to the right port
"Scan Shows Nothing"
Symptoms: AT+GAPSCAN returns no devices.
Solutions:
- Scan longer - Try
AT+GAPSCAN=30for 30 seconds - Move to a different location - Some environments have fewer Bluetooth LE devices
- Use your phone as a test target - Open Bluetooth settings on your phone to make sure at least one device is advertising
- Check you're in Central mode - Run
AT+CENTRALfirst
"Error: Already Advertising/Connected"
Symptoms: Commands fail with error messages.
Solutions:
- Stop advertising first:
AT+ADVSTOP - Disconnect first:
AT+GAPDISCONNECT - Reset to clean state:
ATR(soft reset)
Quick Command Reference
Here's a summary of the commands we covered. For the complete list of AT commands, see the BleuIO AT Commands Reference.

What's Next
In this post, we covered the fundamentals: setting up BleuIO, scanning for devices, understanding scan results, and making your dongle visible. You should now be comfortable with basic AT commands and have a mental model of how Bluetooth LE advertising works.
In the next post, we'll go deeper into advertising—you'll learn how to create custom advertising packets, build an iBeacon, and understand the 31-byte advertising payload format in detail.
Here's what's coming in this series:
- Advertising Deep Dive: Custom packets, iBeacons, and scan response data
- Connections: Establishing links, connection parameters, and GATT discovery
- Reading and Writing Data: GATT operations, characteristics, and notifications
- Python Automation: Scripting your Bluetooth LE workflows
- Common Mistakes: Pitfalls I've seen trip up hundreds of engineers
- Testing and Debugging: Automated validation and troubleshooting techniques
Summary
In this post, we covered:
- What BleuIO is: A Bluetooth LE USB dongle controlled through simple AT commands—no SDK, no embedded C, no compilation
- The portability advantage: BleuIO has its own Bluetooth stack, so you bypass Windows/macOS/Linux Bluetooth entirely—your code works identically on any operating system
- Real-world applications: Production line testing, industrial IoT gateways, automated QA, healthcare device development, and multi-device orchestration
- Setup process: Plug in, connect terminal, verify with
AT→OK - Basic commands:
ATIfor info,AT+GETMACfor address,AT+GAPSTATUSfor state - Scanning:
AT+GAPSCAN=10discovers nearby devices and shows MAC, RSSI, and advertising data - Understanding results: Address types ([0]=public, [1]=random), RSSI as signal strength, advertising data in LTV format
- Advertising:
AT+DEVICENAMEandAT+ADVSTARTmake your dongle visible - Two-dongle advantage: Control both Central and Peripheral for complete visibility
You should now be able to connect a BleuIO dongle, scan for nearby Bluetooth LE devices, interpret the results, and advertise your own device. More importantly, you understand why BleuIO's architecture makes it ideal for building portable, production-ready Bluetooth LE applications.