3.1 How Bluetooth LE Advertising Works
Introduction
In Module 1, you saw advertising in action when you made your peripheral dongle broadcast and your central dongle discover it. You typed AT+ADVSTART, ran a scan, and your device appeared in the results. It worked, but we skipped over the details of what was actually happening under the hood.
Now let's pull back the curtain. In this lesson, we'll look at the radio channels used for advertising, how often packets are sent, the different types of advertising, and the structure of the advertising packet itself. This foundation will set you up for the hands-on exercises in the rest of Module 3, where you'll build custom advertising data byte by byte.
The Three Advertising Channels
Bluetooth LE divides the 2.4 GHz ISM band into 40 channels, each 2 MHz wide. Of these 40 channels, three are dedicated to advertising: channels 37, 38, and 39.
If those numbers seem oddly high for "the first thing that happens," there's a good reason. Channel indices in Bluetooth LE are assigned by function, not by frequency order. The 37 data channels (used during connections) are numbered 0 through 36 first. The three advertising channels then get the remaining indices: 37, 38, and 39. So the numbering reflects what each channel does, not where it sits in the frequency band.
Here's where the three advertising channels actually sit:
| Channel Index | Center Frequency | Position in Band |
|---|---|---|
| 37 | 2402 MHz | Bottom of the band |
| 38 | 2426 MHz | Middle of the band |
| 39 | 2480 MHz | Top of the band |
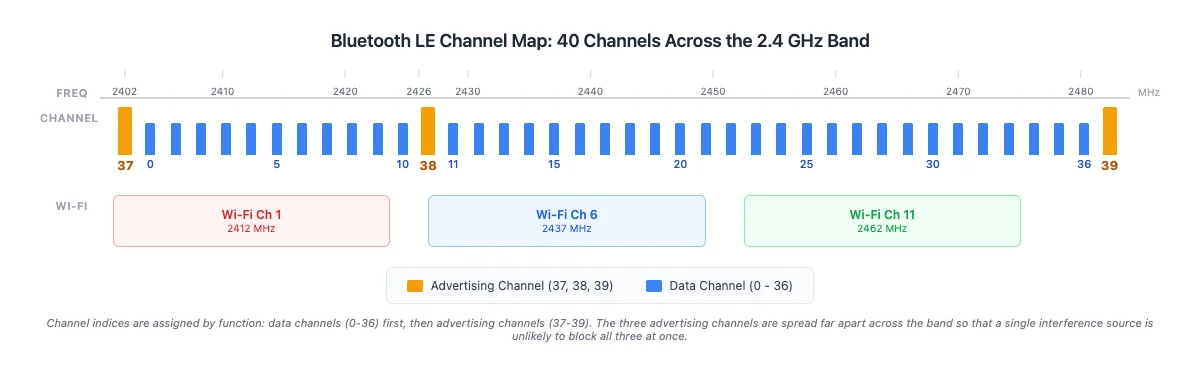
The three are spread far apart on purpose. If a single interference source (like a Wi-Fi access point or a microwave oven) is active on one part of the band, it's unlikely to block all three advertising channels simultaneously. This gives advertising a high degree of resilience through redundancy.
This spread doesn't completely avoid Wi-Fi, but it doesn't need to. The design philosophy is redundancy through spread, not total Wi-Fi avoidance:
- Channel 37 (2402 MHz) overlaps with Wi-Fi channel 1
- Channel 38 (2426 MHz) sits at the edge of Wi-Fi channel 6
- Channel 39 (2480 MHz) is outside all standard Wi-Fi channels
Even with two of the three channels experiencing some interference, one is usually clear enough for reliable discovery.
When a peripheral advertises, it sends the same advertising packet on all three channels in quick succession during each advertising event. When a central scans, it listens on one advertising channel at a time and hops between them. Discovery happens when the central happens to be listening on the same channel the peripheral is broadcasting on. In practice, this alignment happens within a few hundred milliseconds.
Advertising Intervals
The advertising interval controls how often the peripheral broadcasts. It's measured from the start of one advertising event to the start of the next one, not from the end of the last packet. So if the interval is 687.5 ms, the peripheral begins a new burst of advertising packets on channels 37, 38, and 39 every 687.5 ms regardless of how long the previous burst took to transmit. (The spec also adds a small pseudo-random jitter of 0-10 ms to each event start to reduce collisions between nearby advertisers, so your measured gap between events will be slightly larger than the configured interval.)
When you run AT+ADVSTART, the output shows Advertising interval minimum: 1100 maximum: 1100. That value is in Bluetooth LE units of 0.625 ms each, so the actual default interval is 1100 x 0.625 = 687.5 ms, meaning the dongle sends a burst of advertising packets roughly once every 700 ms.
The trade-off is straightforward:
- Shorter interval (e.g., 100 ms) = faster discovery, but more power consumption
- Longer interval (e.g., 5000 ms) = slower discovery, but better battery life
For a battery-powered sensor that needs to last years, you might set intervals of several seconds. For a device that needs to be discovered quickly (like a payment terminal), you'd use a shorter interval. We'll experiment with custom intervals in Lesson 3.6.
Advertising Types
Not all advertising is the same. There are four advertising types in Bluetooth LE, each suited to a different use case. Three properties distinguish them:
- Connectable: can a central initiate a connection with this device? If yes, the device can accept connections. If no, the device is broadcast-only.
- Scannable: can a scanner send a scan request to get additional data? If yes, the device responds with a scan response packet (up to 31 extra bytes). If no, the only data available is what's in the advertising packet itself.
- Directed vs. Undirected: does the advertising target a specific central device, or is it open to any scanner? Directed advertising includes the target central's address in the packet, so only that specific device will respond. Undirected advertising is visible to everyone. Directed advertising is rare in practice; it's mainly used for fast reconnection to a previously bonded device.
With those definitions, here are the four types. The PDU Name column lists the exact name the Bluetooth spec uses for each advertising packet type; you'll see these names again when we look at scan responses, sniffer captures, and spec sections in later lessons.
| Advertising Type | PDU Name | Connectable? | Scannable? | Use Case |
|---|---|---|---|---|
| Connectable Undirected | ADV_IND | Yes | Yes | General-purpose (the most common). Any central can connect and request scan response data. This is what AT+ADVSTART uses by default. |
| Connectable Directed | ADV_DIRECT_IND | Yes | No | Targets a specific central by address. Used for fast reconnection after bonding. No scan response data. |
| Scannable Undirected | ADV_SCAN_IND | No | Yes | Broadcasts data; scanners can request more info via scan response, but cannot connect. |
| Non-Connectable Non-Scannable | ADV_NONCONN_IND | No | No | Pure broadcast. Beacons use this to push data with zero interaction. |
Note that only ADV_IND and ADV_SCAN_IND are scannable, so those are the only two types that ever produce a scan response. We'll look at the scan response flow in detail in Lesson 3.3.
When you run AT+ADVSTART on your BleuIO dongle, it defaults to Connectable Undirected advertising. This is the type you'll use most often because it lets any central discover the device and initiate a connection.
I've found that beginners often assume all advertising is connectable. It's not. Beacons, for example, use non-connectable advertising because they're designed to broadcast data (like a location identifier) without ever accepting a connection. We'll see this in action when we set up iBeacon advertising in Lesson 3.4.
Don't worry about memorizing all four types now. For the exercises in this module, we'll only use Connectable Undirected (the default) and Non-Connectable (for the iBeacon lesson). The other types come up in specific advanced scenarios that we'll cover in later modules.
The 31-Byte Advertising Packet
Let's walk through the advertising packet structure. Each advertising packet can carry up to 31 bytes of data. That might not sound like much, but it's enough to include a device name, a service UUID, and a few custom data fields. This limit exists because advertising needs to be fast and power-efficient; small packets mean short transmission times.
The data inside the packet is organized as one or more AD structures (Advertising Data structures). Each AD structure uses an LTV (Length-Type-Value) format, where the Length byte comes first:
| Field | Size | Description |
|---|---|---|
| Length | 1 byte | Number of bytes that follow (includes the Type byte + all Value bytes) |
| Type | 1 byte | What kind of data this is (name, flags, service UUID, etc.) |
| Value | Variable | The actual data |
The order matters when you're reading raw hex: the very first byte is always the Length, followed by the Type, then the Value bytes. You'll see this order repeatedly when we decode advertising data in the next lesson.
For example, to include a device name like "SENSOR" in advertising data, you'd create an AD structure where the Type is 0x09 (Complete Local Name) and the Value is the ASCII-encoded name. We'll build these structures by hand in the next lesson.
Most Bluetooth LE devices include a Flags AD structure in their advertising packets. Flags tell scanning devices about the advertiser's capabilities: whether it's in discoverable mode, whether it supports BR/EDR (Classic Bluetooth), and so on. On BleuIO, the firmware automatically inserts a 3-byte Flags structure (0x02 0x01 0x06) for connectable advertising. This is a convenience feature of the BleuIO firmware, not a requirement of the Bluetooth specification. On other platforms (like an nRF Connect SDK project), you control whether and how flags are included.
Let's break down the BleuIO flags bytes:
0x02= Length (2 bytes follow)0x01= AD Type for Flags0x06= LE General Discoverable Mode + BR/EDR Not Supported
Since BleuIO auto-inserts these 3 bytes, they count against your 31-byte budget, leaving 28 bytes for your own data on this dongle.
Note: When you query
AT+ADVDATA, the response shows only the data you set, not the auto-inserted flags. But a sniffer capture of the actual packet will show the flags at the beginning.
Starting State
If you've been working through other lessons in this module, reset both dongles to a clean baseline before continuing. This ensures the default advertising parameters (1100 units, connectable undirected) are in use when we observe them below.
Tip:
ATRtriggers a soft reset that takes the dongle through its bootloader. Wait about 15 seconds afterATRfor the dongle to re-enumerate before sending the next command, otherwise it won't be listening yet.
ATR
Wait ~15 seconds for the dongle to reboot and your serial terminal to reconnect (the USB port may re-enumerate), then:
AT+PERIPHERAL
OK
ATR
Wait ~15 seconds for the dongle to reboot and your serial terminal to reconnect (the USB port may re-enumerate), then:
AT+CENTRAL
OK
Try It: Default Advertising and Discovery
Let's confirm everything we've covered above by watching it happen on the dongles. The peripheral will advertise with all defaults, and the central will scan and find it.
Start advertising on the peripheral with no parameters (so all defaults apply):
AT+ADVSTART
Advertising type: GAP_CONN_MODE_UNDIRECTED Advertising interval minimum: 1100 maximum: 1100

ADVERTISING...
Then scan for 5 seconds from the central and look for the peripheral's address in the results. Your peripheral should appear within the 5-second window.
Heads-up on the output below: your peripheral may show up on two consecutive lines with the same bracketed index (
[43]below), once as a bare advertising packet and once with(BleuIO)appended. That's the scanner receiving the advertising packet and the scan response as separate events; see the explanation after the scan output for why. It's real firmware behavior, not a bug.
AT+GAPSCAN=5
SCANNING...

[01] Device: [1]6D:90:11:59:87:8D  RSSI: -72
... (29 more devices trimmed for readability) ...
[31] Device: [0]<PERIPHERAL-ADDRESS>  RSSI: -13
[31] Device: [0]<PERIPHERAL-ADDRESS>  RSSI: -13 (BleuIO)
... (19 more devices trimmed for readability) ...
[50] Device: [1]D3:25:83:77:22:08  RSSI: -49
SCAN COMPLETE
Notice the echoed Advertising interval minimum: 1100 maximum: 1100 on the peripheral side. That confirms the default 1100-unit interval (1100 x 0.625 ms = 687.5 ms) is active. On the central side, the peripheral's address shows up within the 5-second window thanks to the channel hopping we discussed earlier.
Why does the same device index appear on two consecutive lines? The scanner sometimes prints a device twice with the same bracketed index (for example,
[43]followed by[43]): once for the bare advertising packet, then again once the name reveal arrives via a scan response.AT+GAPSCANannotates the second line with(name)because it automatically decodes the Complete Local Name (AD type0x09) from scan data. This is real firmware behavior; it's not a bug.
When you're done, stop advertising on the peripheral:
AT+ADVSTOP
STOPPING ADVERTISING...

ADVERTISING STOPPED.
Command Quick Reference
| Command | What It Does |
|---|---|
AT+ADVSTART | Start advertising (default: connectable undirected, ~688 ms interval) |
AT+ADVSTOP | Stop advertising |
AT+ADVDATA | Query current advertising data |
AT+GAPSCAN=N | Scan for N seconds (recap from Module 1) |
Summary
In this lesson, we:
- Learned that Bluetooth LE uses three advertising channels (37, 38, 39) spread across the 2.4 GHz band for resilient discovery
- Understood why channel numbering starts at 37: indices are assigned by function, with data channels (0-36) numbered first
- Explored advertising intervals and the trade-off between discovery speed and power consumption
- Reviewed the four advertising types and their spec PDU names (
ADV_IND,ADV_DIRECT_IND,ADV_SCAN_IND,ADV_NONCONN_IND) - Examined the 31-byte advertising packet structure with LTV-formatted AD structures
What's Next
In the next lesson, we'll get hands-on with advertising data. You'll learn to encode device names and custom data in hex, build AD structures byte by byte, and set them on your peripheral dongle using AT+ADVDATA. By the end, you'll be able to make your dongle advertise any name you choose.